
Rethinking temperature, sensors, and Raspberry Pi
 Daniel Alan Miller
Getting started on your first hardware project can be difficult. Luckily these days we have things like the Raspberry Pi. which put almost everything we need into a nice bundled package to get started on your first cool hardware project. Even better, the Raspberry Pi runs Rasbian, a variant of Debian, which makes it pretty familiar with those already comfortable with popular Linux distributions. The next step is to connect a sensor and it’s definitely easier than you think. But the question always remains, once I’m collecting my data, where will I store it and how do I easily setup some sort of notification service? In this post, I’ll tell you what you need to do to connect your first sensor, get RethinkDB going on your Raspberry Pi, and push that data to all your devices using PushBullet.
I wasn’t sure what I wanted to do for my first hardware project but having a Raspberry Pi gave me a great place to start. I knew though that if I kept worrying about voltages and GPIO pins I would never get started. So I took a leap and went to Adafruit.com and purchased my first temperature and humidity sensor. I choose the AM2302 because of the support I found on the Adafruit website and the special Python-wrapped C libraries which Adafruit had already written and put up on Github.

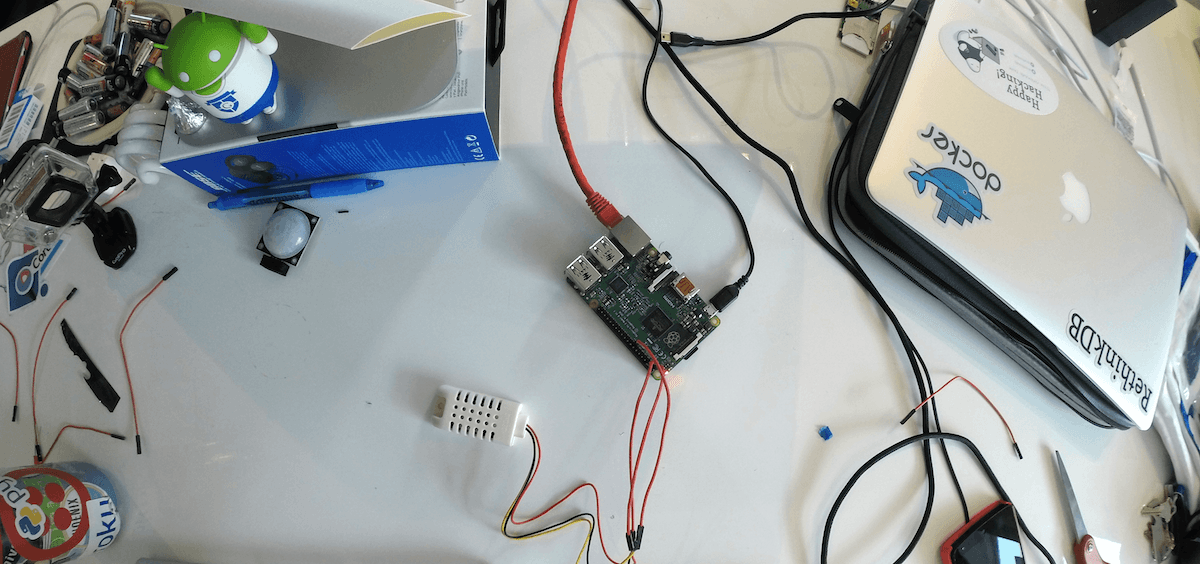
You too can finish your project this fast!
After my sensor arrived, I realized the three cables coming from the sensor couldn’t be directly connected to the Raspberry Pi as the GPIO pins are just that, pins. Where somewhere In my mind I had figured they were female connectors. Not wanting to dive into soldering and burn my fingers or play with molten metal, I decided that I would much rather ride my bike out to Fry’s and get some female-female jumper cables for a couple bucks.
Getting started working with the GPIO pins is also somewhat challenging. As I had already lost my Raspberry Pi instructions within the first 30 seconds of opening the box. Were there any instructions in there anyway? Luckily, the Internet is fully of documentation on the layout of the GPIO pins for each version of the Raspberry Pi. My Raspberry Pi 2 being somewhat different than the previous two. Make sure when wiring up your project that you follow a pinout guide such as this one. Plugging the wires in the wrong places can render your Raspberry Pi unusable, so check twice and plug once!
For reference, I am using BCM pin #22 (not physical pin 22!) for the data port in my future examples.
Getting RethinkDB setup on the Raspberry Pi
I wish I could say that this part of the process took unprecedented hacker skill or intelligence beyond measure on my part, but it’s actually a piece of cake.
Following the [directions here][install_rethinkdb] and assuming you have Rasbian (or other Debian deviant) on your Raspberry Pi you should be good to go. The process takes a couple hours to compile RethinkDB from source (I’m working on the .deb package for ARM). If you have a Raspberry Pi 2 there’s a few modifications that you can make to utilize the extra cores to expedite this process.
I’ve written this quick Github Gist to download and compile on your Raspbery Pi
- If you come across a
virtual memory exhaustederror, you need to increase the swap space by following these instructions. Increasing your swap size to 512MB should be fine but do not forget to change this value back to 100MB once you have successfully compiled RethinkDB.
You can automatically run the script by just copy and pasting this line into your Raspberry Pi 2 terminal:
curl -sL https://gist.githubusercontent.com/dalanmiller/2365fb938fe61f4761c1/raw/22c8c138b48259b3031dfab5edf2f7ece043ee3c/download_rethinkdb_for_raspberry_pi_2.sh | sh
Once it’s complete, you want to make sure that RethinkDB start when your
RethinkDB powers up. To do that, you want to edit the /etc/rc.local file to
look like this:
#!/bin/sh -e
#
# rc.local
#
# This script is executed at the end of each multiuser runlevel.
# Make sure that the script will "exit 0" on success or any other
# value on error.
#
# In order to enable or disable this script just change the execution
# bits.
#
# By default this script does nothing.

# Print the IP address
_IP=$(hostname -I) || true
if [ "$_IP" ]; then
  printf "My IP address is %s\n" "$_IP"
fi

rethinkdb --bind all --server-name rbpi_rethinkdb -d /home/pi --daemon

exit 0
To get RethinkDB running right now, just run this same command you’ve added:
rethinkdb --bind all --server-name rbpi_rethinkdb -d /home/pi --daemon
The code
After you have the hardware setup and where you want it, the rest is a piece of
cake. I’ve written two scripts that will get this project running. The first
will be scheduled to run using cron and the second will be constantly
listening for updates to the database to push them out to you via the PushBullet
API.
The cron job
This code assumes you have installed the rethinkdb and Adafruit_DHT modules.
Everything else used is in the standard Python libraries.
To install the RethinkDB Python driver it’s as easy as:
pip install rethinkdb

#Or if you don't have pip installed: sudo easy_install pip
To install the Adafruit_DHT modules, first clone this repository. Then run python setup.py install from within the
repository directory itself.
The following script is what will be called via a cron job to collect
temperature and humidity data. We don’t need to manually create the database and
table as the script will check for their existence and create them if necessary.
Either copy paste this gist or git clone this URL.
To add this as a cron job, enter sudo crontab -e on your Raspberry Pi 2. My
crontab at this moment looks like this:
* * * * * sudo python ~/pusherRethinkDB.py
This runs the script every minute, for every hour, for every day of the week, for every day of the month, for every day of the week. To run this
less frequently you would change the first asterisk to something like */5 for
every five minutes or */15 to run every fifteen minutes. For more background
on what cron is and how it works, you should check out Cron on Wikipedia or the Ubuntu documentation on Cron.
To make sure the script works properly and to generate the necessary database and table within RethinkDB for the project, just run:
#'sudo' is necessary here to access the GPIO pins
sudo python ~/pusherRethinkDB.py
If your script hangs at Attempting to read from sensor, then you should double
check your jumper wires to make sure that they are connected firmly.
The changefeed whisperer
The other script we are going to run is the one listening to a RethinkDB changefeed and pushing an alert to you when a temperature read is too high or too low. Because of the asynchronous nature of changefeeds, Javascript/Node.js is a natural fit that is easy to follow in terms of logic thanks to the uses of Promises.
To run this code you’ll first need to install Node.js and npm. The easiest way
to do that is to first add the nodesource.com PPA to your APT repositories and
then install node and npm normally.
curl -sL https://deb.nodesource.com/setup | sudo bash -
sudo apt-get install -y nodejs npm
Then we need to install the necessary packages for the script from npm.
sudo npm install -g pushbullet rethinkdb forever bluebird
In order to push notifications for this project I decided to use PushBullet.
PushBullet is a text | link | file notification service and has extensions for
browsers (Chrome, Safari,
Firefox) and nice native apps for both
iOS and Android, as well as a simple
developer API. Truly, an easy five-minute message and notification queue for all
your projects. Before you can use the API you need to sign up for an account, and then grab your access token from the account page. Then just copy paste this into a file in the
same directory as your watcherRethinkDB.js in a file named token.
watcherRethinkDB.js will expect to find this file and read it to find your
token.
Now that we have all of our node.js dependencies installed, we can now run the
watcherRethinkDB.js script. Once again, you can copy and paste this gist or
git clone from this URL on your RBPi. Just make sure that the
script is referenced correctly further along.
We can set this up to start on bootup of the Raspberry Pi easily by adding
another line to cron. cron has a few special shortcut commands and the one
for the job here is @reboot which says to run a command only at reboot and not
until the next reboot. So sudo crontab -e once more and add the following
line.
@reboot forever start ~/watcherRethinkDB.js
Typically, you execute node files by running node script.js but we are going
to use the forever utility which will ensure that even if our
watcherRethinkDB.js crashes, it will automatically restart it . To get it
going right now, just run:
forever start ~/watcherRethinkDB.js
Finalizing your first sensor setup
Lastly, we are going to give your setup a whirl. Reboot your Raspberry Pi and then get back to the command line. Let’s check if the watcher script is running:
ps -ef | grep node
You should see something similar to this:
pi@dalanmiller-pi ~ $ ps -ef | grep forever
pi        3155     1 14 13:46 ?        00:00:02 /usr/bin/nodejs /usr/lib/node_modules/forever/bin/monitor watcherRethinkDB.js
Now, I recommend leaving the portion of the script that will push you a message even at a nominal temperature uncommented out just to make sure it works and comment it out once you get a message through PushBullet as to not spam you with “The temperature is totally fine.” Once you get that message once, you’ve finished baking your first Raspberry Pi project!
One hard part of figuring out a project is the real-world use case. But there are really countless places where having a temperature sensor could be handy:
- Making sure your pets aren’t too cold or warm at home.
- Are your water pipes on the verge of freezing while you’re on vacation?
- Keeping an optimal temperature in your greenhouse or small gardening experiment.
- Monitoring a basement or home areas near water for humidity and possible mold.
- Find out if a pesky family member is turning up the heat in the middle of summer.
Now that you have RethinkDB going on your Pi, you have an easy way to not only be notified when the temperature hits a desired threshold but also a way to easily query all collected data without burying yourself in text logs or worrying about losing your data when your Raspberry Pi resets.
Need help or advice on how to setup your Pi or connect to your Pi wirelessly?
Or just advice on your project? Hit me (@dalanmiller) up on Twitter.
The sixth sensor (going further)
Later on you may want to come back and do some analyses on the temperature or humidity observations you’ve collected. Here are some examples of advanced queries that could help get you bootstrapped a little faster.