Drive iOS push notifications with RethinkDB changefeeds
 Ryan Paul
Push notifications provide a useful bridge between web applications and mobile clients, enabling a more seamless user experience across screens. RethinkDB changefeeds make it easy for developers to add push notification support to existing applications–using an event-driven approach that doesn’t require the developer to add much additional plumbing.
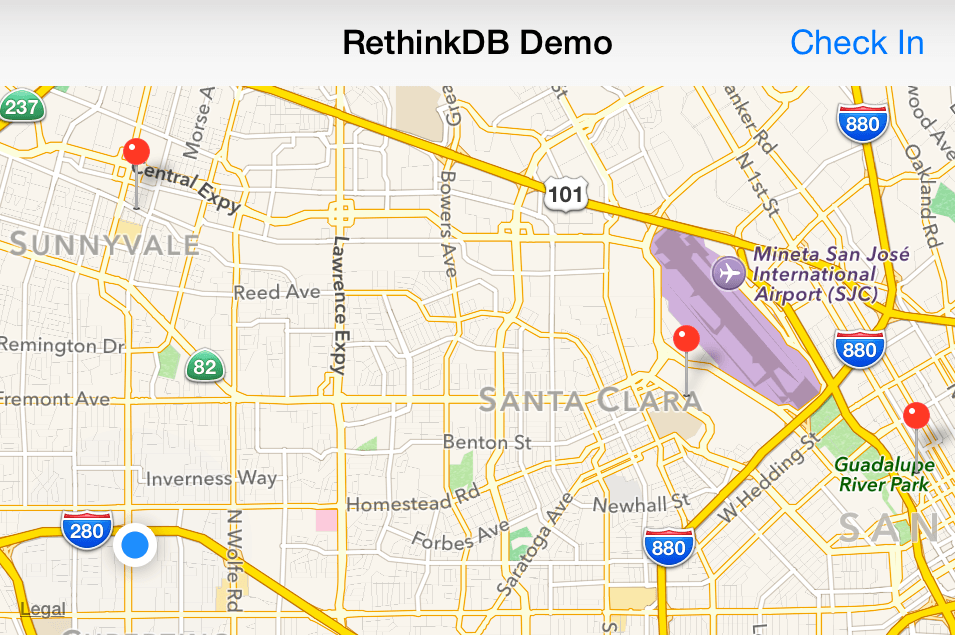
In this blog post, I’ll demonstrate how to wire up RethinkDB changefeeds to iOS push notifications, conveying realtime updates to iPhone users. For my demo, I built a simple location checkin app that takes advantage of GPS on the user’s mobile device and RethinkDB’s geospatial indexing on the backend. When a user checks in, the backend sends a push notification to every user whose last checkin was made within 100 miles of the new checkin. A map view in the app displays pins, marking all the nearby checkins.
The backend is implemented in JavaScript with Node.js and Express. It uses the
node-apn library to communicate with Apple’s push notification
infrastructure. The frontend is a fully native iOS application written in
Swift.
Introduction to iOS push notifications
As the name suggests, Apple’s Push Notification Service (APNS) is a hosted service that developers can use to deliver push notifications to Apple devices. An application’s backend server maintains a persistent connection with APNS, using it to relay messages to the corresponding mobile application as needed.
In order to take advantage of APNS, you must first use Apple’s developer portal to create an application ID and push notification certificates. You will also need to create an appropriate provisioning profile in order to test push notification functionality during development on a tethered iOS device. Apple does not allow developers to test push notifications in the iOS simulator–you will need actual hardware.
Describing all of the steps for provisioning and certificate creation is beyond the scope of this blog post, but there are a number of good tutorials available that fully elucidate the process.
Set up push support in a Swift application
To receive notifications from APNS, an iOS application must call the
registerForRemoteNotifications method on a UIApplication instance. If the
application succeeds in registering with APNS, then it will trigger a function
that receives a device token. If APNS registration fails, then it will trigger
an error callback instead.
The following code demonstrates how to register for remote notifications and
store the device token in a property of the UIApplicationDelegate:
class AppDelegate: UIResponder, UIApplicationDelegate {

    var window: UIWindow?
    var deviceToken: String?

    func application(application: UIApplication, didFinishLaunchingWithOptions launchOptions: [NSObject: AnyObject]?) -> Bool {
        var settings = UIUserNotificationSettings(forTypes: .Badge | .Alert | .Sound, categories: nil)
        application.registerUserNotificationSettings(settings)
        application.registerForRemoteNotifications()
        return true
    }

    func application(application: UIApplication, didRegisterForRemoteNotificationsWithDeviceToken deviceToken: NSData) {
        self.deviceToken = deviceToken.description
    }

    func application(application: UIApplication, didFailToRegisterForRemoteNotificationsWithError error: NSError) {
        println(error.localizedDescription)
    }
}
The device token is a unique value that is specific to the application and device. When a remote service wants to send a message to the device through APNS, it uses the token to specify the recipient of the message.
Handle user checkins
My demo app backend provides a simple API for publishing new checkins and
retrieving all checkins near a given location. To broadcast a new checkin, the
mobile application sends an HTTP POST request with a JSON body that includes
the user’s coordinates and push notification device token. The URL route
handler for the endpoint creates a table record for the data, first
transforming the coordinates into a ReQL r.point object.
For the purposes of this demo, I chose to use the notification token as the record ID. I also chose “update” as the insert operation’s conflict resolution behavior, ensuring that the application retains only the latest checkin from each user.
The following JavaScript code sets up a simple Express server with an
/api/checkin URL endpoint that accepts the POST request from the mobile
application:
var express = require("express");
var bodyParser = require("body-parser");
var r = require("rethinkdb");

var app = express();
app.use(bodyParser.json());
app.listen(8090);

app.post("/api/checkin", function(req,res) {
  var token = req.body.token.replace(/[<> ]/g, "");
  var place = r.point(req.body.place[1], req.body.place[0]);

  r.connect().then(function(conn) {
    return r.table("users").insert({id: token, place: place, time: r.now()},
      {conflict: "update"}).run(conn)
    .finally(function() { conn.close(); });
  })
  .then(function(output) {
    res.json({success: true});
  });
});
In the URL route handler, the code responsible for extracting the token does a little bit of parsing: it strips out spaces and angle brackets. The actual token is a simple hex value, but the mobile API that provides access to the token emits it with space-delimited character pairs enclosed in angle brackets. You have to strip those extraneous symbols before using the hex string with Apple’s push notification service.
The handler uses a simple ReQL query to add the location checkin to the database. If the operation completes successfully, it returns a little JSON message so that the mobile app knows that everything worked as expected.
The next step is to implement the frontend mobile code that obtains the user’s coordinates and transmits the HTTP POST request. My demo app performs those tasks in the application’s view controller, which incorporates the CLLocationManager delegate:
class ViewController: UIViewController, UINavigationBarDelegate, CLLocationManagerDelegate {

    var locationManager: CLLocationManager!

    override func viewDidLoad() {
        super.viewDidLoad()

        // Start tracking the user's location
        locationManager = CLLocationManager()
        locationManager.delegate = self
        locationManager.desiredAccuracy = kCLLocationAccuracyBest
        locationManager.requestWhenInUseAuthorization()
        locationManager.startUpdatingLocation()
    }

    ...

    @IBAction func sendMessage(sender: AnyObject) {
        // Get the user's current position from the location manager
        var position = locationManager.location.coordinate
        var appDelegate = UIApplication.sharedApplication().delegate as! AppDelegate

        // Build the data payload to send to the checkin API
        var params = Dictionary<String, AnyObject>()
        params["place"] = [position.latitude, position.longitude]
        params["token"] = appDelegate.deviceToken

        // Build the HTTP POST request that performs the checkin
        var req = NSMutableURLRequest(URL: NSURL(string: "http://youraddress.ngrok.com/api/checkin")!)
        // Convert the payload to JSON and set it as the request body
        req.HTTPBody = NSJSONSerialization.dataWithJSONObject(params, options: nil, error: nil)
        req.HTTPMethod = "POST"

        req.addValue("application/json", forHTTPHeaderField: "Content-Type")
        req.addValue("application/json", forHTTPHeaderField: "Accept")

        // Perform the HTTP POST request
        NSURLConnection.sendAsynchronousRequest(req, queue: NSOperationQueue.mainQueue()) {(resp, data, err) in
            // Parse the JSON response and determine if the checkin was successful
            if let output = NSJSONSerialization.JSONObjectWithData(data, options: nil, error: nil) as? NSDictionary {
                println(output["success"] as? Bool)
            }
        }
    }
}
In the viewDidLoad method, I instantiate and configure the
CLLocationManager instance. When I call the startUpdatingLocation method,
it will begin tracking the user’s coordinates. I can retrieve the latest
location value by accessing the location property of the location manager.
Note: Be sure to add a location permission key like NSLocationWhenInUse
to your application’s plist when using CLLocationManager.
The sendMessage function is an action that I attached to a checkin button in
the view’s storyboard. In the function, I create a JSON object that includes
the device token and coordinates from the location manager. I make an
NSMutableURLRequest that contains the JSON payload as its body. When I
execute the HTTP request, I parse the JSON output to verify that the operation
succeeded.
Relay changefeed output to APNS
Now I want to add a changefeed so that I can track checkins and use them to trigger push notifications. Every time a user checks in, I want to send a push notification to all users within a 100 mile radius.
The following code shows how to create a connection to APNS, use changefeeds to track new checkins, and take advantage of geospatial indexing to broadcast a push notification to every nearby user when a new checkin arrives:
var apn = require("apn");
var fs = require("fs");
var r = require("rethinkdb");

// Set up the APNS connection
var apnConnection = new apn.Connection({
  key: fs.readFileSync("key.pem"),
  cert: fs.readFileSync("cert.pem"),
  passphrase: "xxxxxxxxxxx",
  production: false
});

r.connect().then(function(conn) {
  // Attach a changefeed to the `users` table
  return r.table("users").changes().run(conn);
}).then(function(change) {
  // Iterate over each change to the table
  change.each(function(err, item) {
    // Ignore deleted items
    if (!item.new_val) return;
    // Find all of the users within 100 miles of the checkin
    r.table("users").getIntersecting(
      r.circle(item.new_val.place, 100, {unit: "mi"}),
        {index: "place"}).run(conn).then(function(users) {
      users.each(function(err, user) {
        // Don't notify a user of their own checkin
        if (user.id === item.new_val.id) return;

        // Create the notification
        var note = new apn.Notification();
        note.sound = "ping.aiff";
        note.alert = "A user checked in nearby";
        note.payload = item.new_val.place;

        // Transmit the push notification
        apnConnection.pushNotification(note, new apn.Device(user.id));
      });
    });
  });
});
The apn.Connection method creates a persistent connection to APNS. It takes
several options, including the certificate and key that you need to
authenticate your connection. In the example above, I explicitly set the
production option to false to tell the node-apn library that we want to
use the APNS sandbox server rather than the production server.
After establishing the APNS connection, the next block of code attaches a
changefeed to the users table to catch all of the checkins. For each checkin,
it uses the getIntersecting ReQL command to find all of
the nearby users. Finally, it iterates over each nearby user and sends a push
notification to each one.
Display nearby checkins on the map
If a user receives a push notification while the application has focus, the platform doesn’t display it on the screen. The developer has the opportunity to implement a custom behavior that occurs instead. In my demo application, I want to simply plot the location of newly-received checkins on the map view.
To handle foreground push notifications, I added the following function to my
AppDelegate:
func application(application: UIApplication, didReceiveRemoteNotification userInfo: [NSObject : AnyObject]) {
    if let coords = userInfo["coordinates"] as? NSArray, lon = coords[0] as? Double, lat = coords[1] as? Double {
        var view = window?.rootViewController as? ViewController
        view?.addMapAnnotation(lon, lat: lat)
    }
}
As you can see, it extracts the checkin coordinates from the notification
payload and passes the location to an addMapAnnotation function in the view
controller. The addMapAnnotation function, which you can see below, simply
adds a pin to the map at the specified location:
func addMapAnnotation(lon: Double, lat: Double) {
    var newPin = MKPointAnnotation()
    newPin.coordinate = CLLocationCoordinate2DMake(lat, lon)
    mapView.addAnnotation(newPin)
}
When a new checkin occurs within 100 miles of the user’s last checkin, the backend will send a push notification to the user’s device, which causes a pin to appear in the map.
Keep in mind that this behavior will only occur when the application is actively running. To round out the demo app, the last step is adding support for populating the map view with recent checkins when the application launches. In order to accomplish that, you will need a new backend API endpoint:
app.get("/api/pins", function(req, res) {
  var place = req.query.place.split(",");

  r.connect(config.db).then(function(conn) {
    return r.table("users").getIntersecting(
      r.circle([+place[1], +place[0]], 100, {unit: "mi"}), {index: "place"})("place").run(conn)
      .finally(function() { conn.close(); });
  })
  .then(function(cursor) { return cursor.toArray(); })
  .then(function(output) { res.json(output); });
});
The code above finds all of the checkins within 100 miles of the designated
latitude/longitude pair. The user passes the starting point in a URL query
parameter. In the mobile client, I added the following code to the
ViewController to make it populate the map:
var position = locationManager.location.coordinate
var url = "http://yourapp.whatever.com/api/pins?place=\(position.latitude),\(position.longitude)"
var req = NSURLRequest(URL: NSURL(string: url)!)

NSURLConnection.sendAsynchronousRequest(req, queue: NSOperationQueue.mainQueue()) {(resp, data, err) in
    if let places = NSJSONSerialization.JSONObjectWithData(data, options: nil, error: nil) as? NSArray {
        for place in places as! [NSDictionary] {
            if let coords = place["coordinates"] as? NSArray, lon = coords[0] as? Double, lat = coords[1] as? Double {
                self.addMapAnnotation(lon, lat: lat)
            }
        }
    }
}
As you can see, RethinkDB can help simplify your backend architecture when you implement realtime features like push notifications. Changefeeds make it particularly easy to add mobile push notifications to existing web applications–you can tap directly into realtime events at the persistence layer instead of restructuring your backend to accommodate the new functionality.
Want to use RethinkDB to build the backend for your next mobile application? Install RethinkDB and check out our ten-minute RethinkDB quickstart guide.
Resources:
- Full source code of the push notification demo app
- Tutorial that describes how to setup iOS push notification certificates
- Official RethinkDB changefeed documentation